
SPENCER
Finally finished a first pass on the recoil system this week and I’m really happy with the results. I experimented with a few different techniques to get to where I wanted, taking inspiration from CS, Battlefield and Insurgency.
The first challenge with the system was to ensure despite the randomness of the recoil patterns, that both the server and client could independently reproduce the same randomness for client side prediction of bullets. The solution I came up with was to seed every frame where random recoil data was needed with the entity time of the player (something that both server and client will always agree upon). Typically pseudo random functions don’t give a particularly even distribution when re-seeded every frame with linearly changing seeds (time always ticks up by one) so instead I created a long buffer of a random bytes of data using Random.Next() which I can use as seekable random lookup later. This also ensures the performance of the random function is as good as it can get.
On the first pass, I used a lookup table for each consecutive bullet fired and increased the recoil to that specific point after each bullet. The reason using a lookup instead of complete randomness, is to give players the ability to get muscle memory for the recoil patterns, creating a higher skill ceiling for gunplay. While this method had the desired muscle memory effect, it didn’t feel enough like a powerful kickback. The animation side / feel of the gun was a bit lacking, it also made it hard to evenly interpolate out of the recoil position without deviating from the pre-determined path. In other words the fallback looked like inverse recoil.
My second approach was to use a lot more randomness. I replaced the method driving the recoil from being a pre-defined path, to using a spring and applying random forces to it. This had a bit more of a recoil like feel, but took away most muscle memory effects, and was very hard to tune over a long period of spray.
The thing I found was if the recoil was strong enough to make you inaccurate on its own while still firing where your crosshair is, it felt too intense. I decided to introduce a layer of inaccuracy over the recoil pattern that increases over time. This way I can keep both effects fairly subtle, but combined they give a decent effect on your ability to hit a target without feeling crazy.
I also replaced the random spring kick with a bullet index lookup based on shots fired in spray which brought back the muscle memory nicely. However there was still a lack of kickback feeling on the gun. I narrowed it down to the fact that, while your game is usually animating at ~60+ fps, the equipment is simulated at 20fps. The render thread interpolates between equip simulation ticks to ensure motion continuity, however this smooths out the initial spike from the recoil kick taking away a lot of its punch. What I did to solve this was to add a second much tighter spring that runs on the render thread, and applies a consistent kick with is likely only visible for a frame or two but layers over the top of the 20hz spring to give it a bit more heart.
The result at this point looks like this:
Note muzzleflash and gunsmoke are currently disabled, they will be added back in later
You’ll notice that I drive the inaccuracy (not recoil) curve of a few different factors:
I am in the process of getting the ItemV2 branch back into a playable state now, once that is complete we will be doing some deathmatch testing with the AR, iterating a bit then we play to release a gunplay preview branch to get your guys feedback. There is still a heap to do on gunplay like sound, impact feedback like better tracers, blood impacts and sounds. We will be iterative on these over the coming weeks.
COW_TRIX
Been smashing out a new road tool this week, and I’ve made some substantial progress. Warning! This section is probably not going to be super interesting for people who aren’t making a road tool themselves, or don’t have an interest in programming and mathematics. For those two categories of people though, I hope that this may be valuable for your own solutions to this problem. So, how do we build a procedural road network in a flexible, extensible, reliable way?
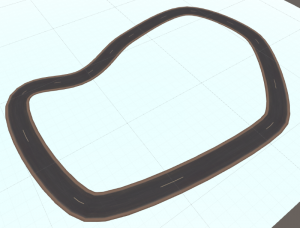
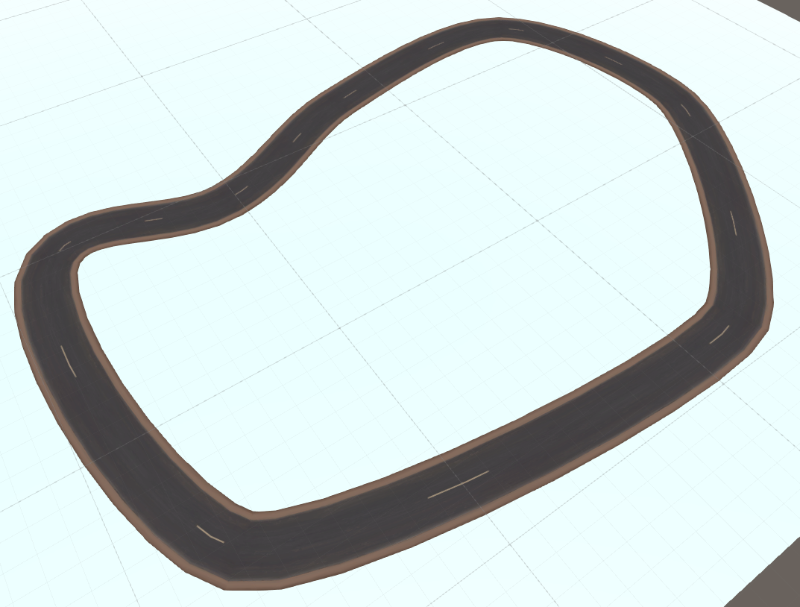
A simple mesh distorted along a series of splines
I boiled the whole concept down from roads and intersections and all that stuff to a much more abstracted model of a managed network of nodes. All a node is is a position in space, and connections to other nodes. A node by itself is not particularly important in isolation, as it’s the connections that will make up our roads after all. The first thing I did was set up this basic structure, of the network owning the nodes, the nodes owning connections to other nodes, and then the connections owning components that would do things to create the road in the world. So, for instance, the thing that is responsible for warping a mesh along the connection is a component, as is the thing responsible for changing the height of the terrain under the road to match it. As we want our roads to curve smoothly between nodes, we need to interpolate between them. The usual solution, and the path I went down, wasquadratic bezier splines, which have some convenient properties. This page is a must-read resource for the algorithms behind this part of the system.
So, the next step was warping a mesh along this spline. This is the first connection-component I wrote. The easiest way to do this is to envision one axis of the mesh as being the special spline-axis. What you then do is iterate through the vertexes, translate the mesh vertex position from this straight axis to the warped spline axis (using the bounds of the mesh as your normalization – after all, the spline t value must be between 0 and 1!), and there you go! Some road tools use a different methodology where they procedurally generate the mesh as they march along the spline, but to be honest it doesn’t seem worth the time and effort for me, and there’s just a million more places where things could go wrong. It’s an editor tool after all – if it can be done better in a different program, like a 3D modelling tool, it should be done there! Using our methodology means we can distort arbitrarily complex meshes as roads without increasing the complexity of the code. The caveats for this methodology is that we need to implement tiling in our input models (although really we would have to do this with the other methodology as well), and that we need to do a final UV pass to “undistort” the UVs. This UV pass is necessary due to one of the properties of bezier splines – that the “natural time”, the t value we feed the bezier algorithm doesn’t correlate with the distance we’ve traveled along the spline. So we cannot assume that a base mesh with evenly spaced verts will result in a warped mesh with evenly spaced verts, even if we’re distorting it along a completely straight spline. So, we have to re-UV.
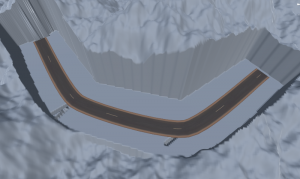
Eesh! A naive spline-marching implementation of setting the terrain heights
The second challenge has been to make the underlying terrains come up to meet the road in a way that doesn’t result in significant clipping. I first tried a naive method of just marching along a spline, and drawing a line along the spline on the heightmap as I went. Unfortunately this didn’t work particularly well – even on completely flat roads, as shown to the right. When we transition from one spline to the next, we get significant tearing. It is also slow to calculate, and when you change the heights of nodes to something extreme, you get significant stepping depending on the order you march through the splines, so I changed tactic.
The second methodology I used was to take the bounds of the spline, and iterate through every heightmap point in that bounds. For every point on the heightmap, the question is – what is the closest point on the spline? If we can find the closest point on the spline, and set the height at this point on the heightmap to the height at that point, then we’ll get a nice, smooth and well fitting curve on the heightmap that will fit exactly under the road. Unfortunately, due to the whole thing with no non-integrated solution to correlating natural time with real distance through a spline, there’s no exact solution to this. We just have to find a decent approximate solution. I found some resources on this problem, but I’m the kind of programmer to just jump into a problem and try and solve it from the basics. A simple solution that I figured would work in all practicable solutions, where we weren’t doing crazy distorted splines, was just a binary search. The binary search is structured like so: start with an arbitrary point in space, p. take a segment (beginning with [0, 1]) and split it in half, so you have three points along the spline, p0, p1, and p2. Calculate the distance between p and all of these points. Now, compare the combined distances of p0 + p1, and p1+p2. Based on these results, we change the range we’re looking at on the spline and repeat the procedure, until some threshold of the accuracy of t is reached. The advantage is that the amount of iterations the algorithms requires is constant, depending on the accuracy threshold required. This works pretty well, and you can see a gif of the algorithm here:

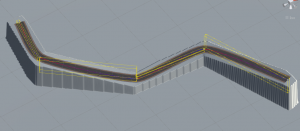
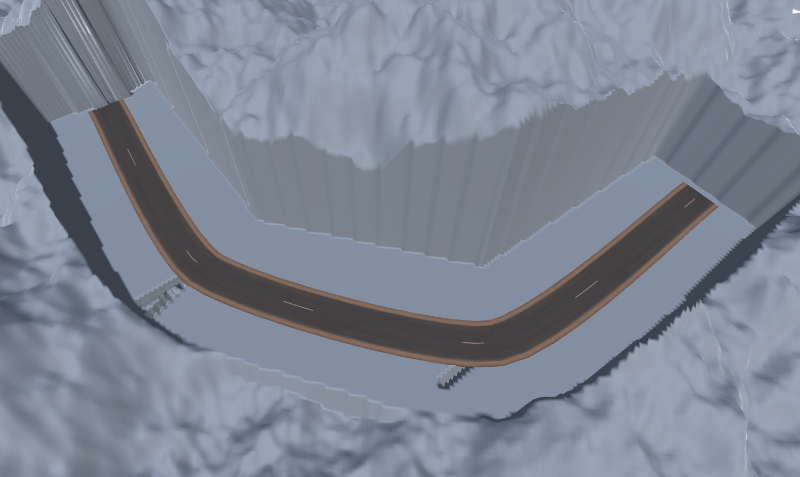
So, now we have the closest point, it’s trivial to figure out what height a certain point in the terrain needs to be. From this poin, all I needed to do was blend the height we calculated with the road height, based on some falloff. However, this was still a little slow, so I put in the ability to get a spline’s object bounding box, so we can cull a large amount of height calculations for roads that aren’t orthogonal to the terrain heightmap grid. This sped up the calculation speed a lot. Throw in a blend with the original terrain, and this is the end result:

I’m pretty happy with this result! Next steps are implementing the UV mapping, and tiling meshes along a spline to allow for better poly concentrations on hard bends. More on this next week!
GAVKU
This week I have finished of a version of the jacket and done a few texture varieties for it. Its been made in such a way that you will be able to view gear you have equipped underneath it, ie a tshirt or combat vest that your character may be wearing.
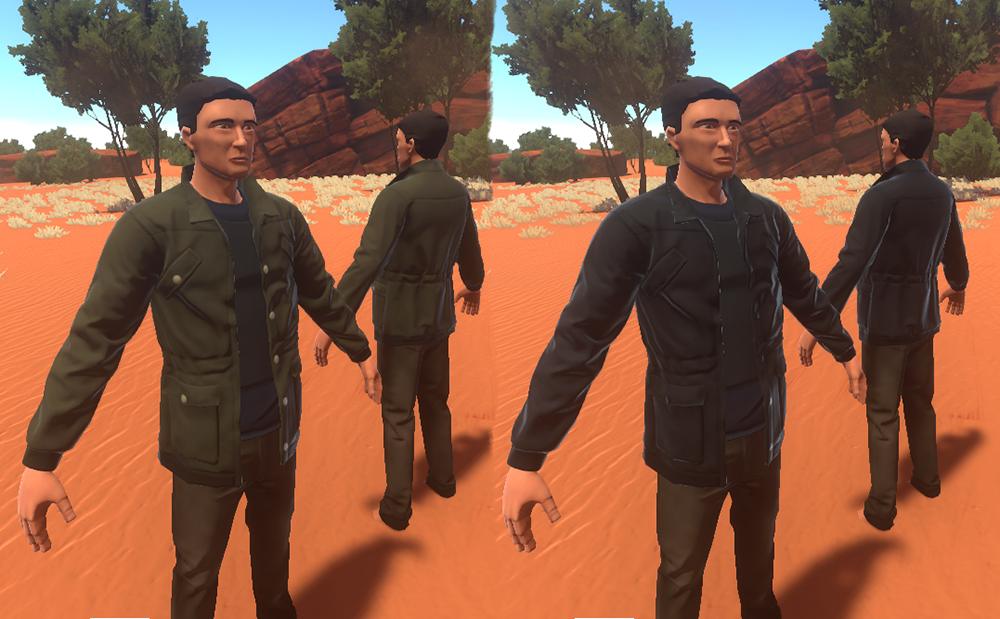
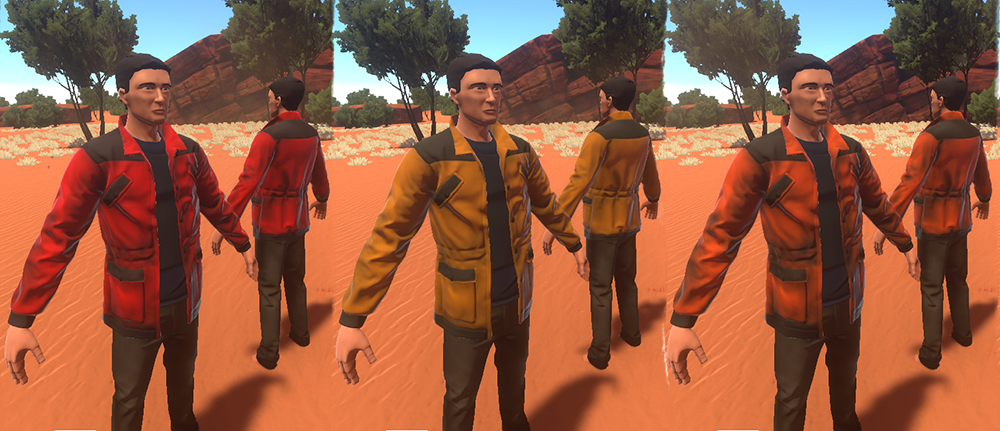
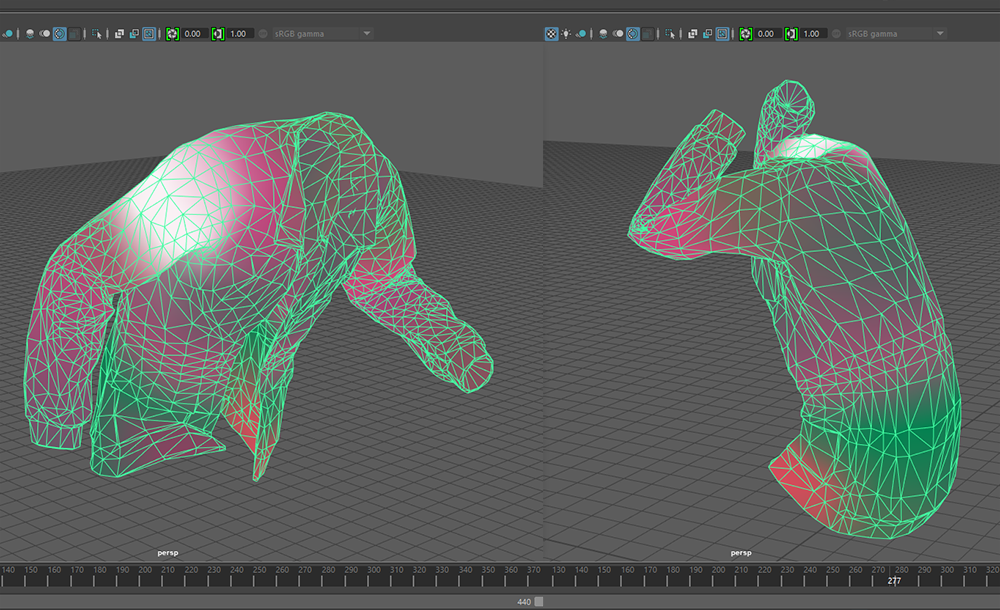
This also involved tweaking and skinning to make sure there wasn’t an egregious amount of clipping with the gear underneath. To do this I bring a new mesh into a maya skinning file that has the player skeleton and base meshes loaded, as well as some test anims of his movement. I then copy skin weight of the player across and start testing the deformation, tweaking parts of the skin data until its at an acceptable point.
MILS
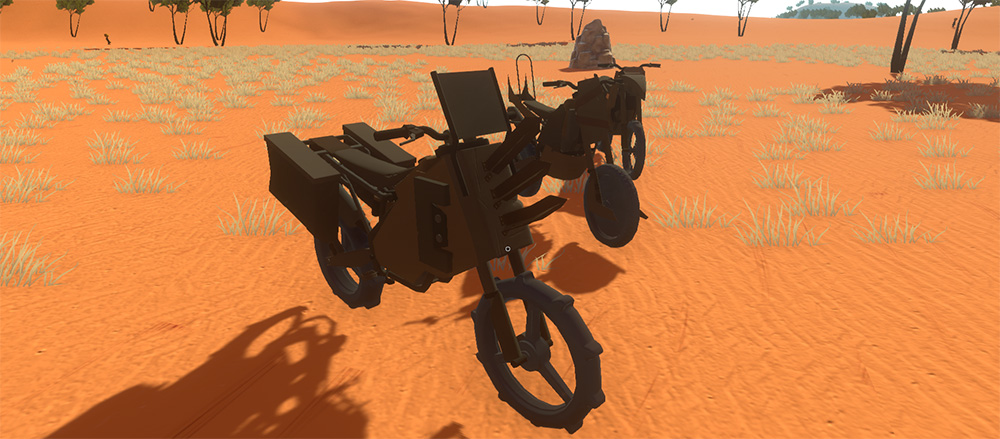
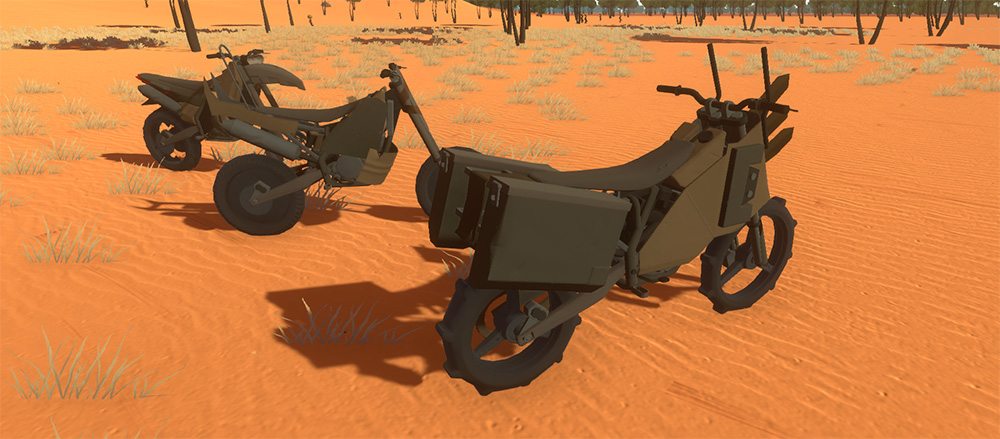
I made it to texture town this week. So I just did a little flat colour testing across the meshes. It’s looking really nice, all the normal maps came out well. I gave Tom the mesh and textures to make some gifs. Next week I’ll be adding some extra bits to the normal map and then moving onto the base texture details. After that I’ll design the graphics for the body kits and then I’ll be done.


TOM
I started this week working on validation for the crash system, adding checks to make sure you can’t use crashing to glitch through bases and terrain.
The crash system works by putting the player inside an invisible vehicle they have no control over and letting them tumble around until they come to a stop, then they get out. There are two opportunities for glitching, spawning the crash vehicle and leaving it after the crash.
Whilst it is easy enough to do various combinations of raycasts and overlap checks to check the new positions are clear, it is tricky to decide what should be done if these checks fail. For instance we perform similar checks currently when exiting vehicles to prevent players exiting through a wall into someones base, if the all the vehicle exits fail this check we prevent the player from leaving the car. Unfortunately this isn’t a good solution for the crash vehicle as you’d find yourself stuck forever if you come to a stop in an invalid location. Another option could be to kill the player but we felt this would be far too frustrating for players.
What we’re going to try is putting the player into a crawl mode after a post-crash validation fail which will allow the player to control their crash vehicle with physics forces until they push themselves into a location where it’s clear for them to stand up.
For spawning the crash vehicle we perform a capsule cast from the motorbike location to the desired spawn point, if this fails we spawn the crash vehicle directly on top of the motorbike instead.
Also this week I’ve been working on balancing vehicle damage. Just having an overall vehicle health felt a bit simplistic and led to vehicles either feeling like bullet sponges or being unrealistically weak so I’ve made the vehicle attachments a bigger part of the picture.
Technically currently on live all the attachments have their own health and can be individually destroyed in the same way you can remove wheels by shooting them off it’s just that all items but the wheels have huge damage reduction on them making it impractical and wasteful to remove them in this way.
I’ve rebalanced all these modifiers effectively reducing their health to reasonable levels and changed their behaviour so projectiles will no longer penetrate through vehicles like they do to players and made it so damage received by a vehicle attachment will not transfer through to damage on the vehicle.
This allows us to have reasonable levels of vehicle health without them feeling too weak and we can create more interesting attachments to drive decisions like, ‘do I use the heavy but strong armor panels or the lighter, faster but weaker panels?’.
It also allows us to do cool things like if you shoot storage panels off vehicles they will drop any loot being held in the additional storage slots.
I’ve also been tweaking explosions so vehicles take extra damage leading to chain explosions and making explosives a relatively hard counter to vehicles. I also made explosions apply a brief heat effect to nearby entities which if you’re close enough can be hot enough to ignite you (or in this case, the vehicle corpses left behind).
I’ve also been working getting Mils latest art into the game and setting up the paint slots and masks, its really starting to come together!
As for what’s left to do before you can get your hands on it:
Finally finished a first pass on the recoil system this week and I’m really happy with the results. I experimented with a few different techniques to get to where I wanted, taking inspiration from CS, Battlefield and Insurgency.
The first challenge with the system was to ensure despite the randomness of the recoil patterns, that both the server and client could independently reproduce the same randomness for client side prediction of bullets. The solution I came up with was to seed every frame where random recoil data was needed with the entity time of the player (something that both server and client will always agree upon). Typically pseudo random functions don’t give a particularly even distribution when re-seeded every frame with linearly changing seeds (time always ticks up by one) so instead I created a long buffer of a random bytes of data using Random.Next() which I can use as seekable random lookup later. This also ensures the performance of the random function is as good as it can get.
On the first pass, I used a lookup table for each consecutive bullet fired and increased the recoil to that specific point after each bullet. The reason using a lookup instead of complete randomness, is to give players the ability to get muscle memory for the recoil patterns, creating a higher skill ceiling for gunplay. While this method had the desired muscle memory effect, it didn’t feel enough like a powerful kickback. The animation side / feel of the gun was a bit lacking, it also made it hard to evenly interpolate out of the recoil position without deviating from the pre-determined path. In other words the fallback looked like inverse recoil.
My second approach was to use a lot more randomness. I replaced the method driving the recoil from being a pre-defined path, to using a spring and applying random forces to it. This had a bit more of a recoil like feel, but took away most muscle memory effects, and was very hard to tune over a long period of spray.
The thing I found was if the recoil was strong enough to make you inaccurate on its own while still firing where your crosshair is, it felt too intense. I decided to introduce a layer of inaccuracy over the recoil pattern that increases over time. This way I can keep both effects fairly subtle, but combined they give a decent effect on your ability to hit a target without feeling crazy.
I also replaced the random spring kick with a bullet index lookup based on shots fired in spray which brought back the muscle memory nicely. However there was still a lack of kickback feeling on the gun. I narrowed it down to the fact that, while your game is usually animating at ~60+ fps, the equipment is simulated at 20fps. The render thread interpolates between equip simulation ticks to ensure motion continuity, however this smooths out the initial spike from the recoil kick taking away a lot of its punch. What I did to solve this was to add a second much tighter spring that runs on the render thread, and applies a consistent kick with is likely only visible for a frame or two but layers over the top of the 20hz spring to give it a bit more heart.
The result at this point looks like this:
Note muzzleflash and gunsmoke are currently disabled, they will be added back in later
You’ll notice that I drive the inaccuracy (not recoil) curve of a few different factors:
- How long you’ve been spraying for
- If you are sighted
- How fast you are moving
- If you’re crouching
- If you are grounded
I am in the process of getting the ItemV2 branch back into a playable state now, once that is complete we will be doing some deathmatch testing with the AR, iterating a bit then we play to release a gunplay preview branch to get your guys feedback. There is still a heap to do on gunplay like sound, impact feedback like better tracers, blood impacts and sounds. We will be iterative on these over the coming weeks.
COW_TRIX
Been smashing out a new road tool this week, and I’ve made some substantial progress. Warning! This section is probably not going to be super interesting for people who aren’t making a road tool themselves, or don’t have an interest in programming and mathematics. For those two categories of people though, I hope that this may be valuable for your own solutions to this problem. So, how do we build a procedural road network in a flexible, extensible, reliable way?
A simple mesh distorted along a series of splines
I boiled the whole concept down from roads and intersections and all that stuff to a much more abstracted model of a managed network of nodes. All a node is is a position in space, and connections to other nodes. A node by itself is not particularly important in isolation, as it’s the connections that will make up our roads after all. The first thing I did was set up this basic structure, of the network owning the nodes, the nodes owning connections to other nodes, and then the connections owning components that would do things to create the road in the world. So, for instance, the thing that is responsible for warping a mesh along the connection is a component, as is the thing responsible for changing the height of the terrain under the road to match it. As we want our roads to curve smoothly between nodes, we need to interpolate between them. The usual solution, and the path I went down, wasquadratic bezier splines, which have some convenient properties. This page is a must-read resource for the algorithms behind this part of the system.
So, the next step was warping a mesh along this spline. This is the first connection-component I wrote. The easiest way to do this is to envision one axis of the mesh as being the special spline-axis. What you then do is iterate through the vertexes, translate the mesh vertex position from this straight axis to the warped spline axis (using the bounds of the mesh as your normalization – after all, the spline t value must be between 0 and 1!), and there you go! Some road tools use a different methodology where they procedurally generate the mesh as they march along the spline, but to be honest it doesn’t seem worth the time and effort for me, and there’s just a million more places where things could go wrong. It’s an editor tool after all – if it can be done better in a different program, like a 3D modelling tool, it should be done there! Using our methodology means we can distort arbitrarily complex meshes as roads without increasing the complexity of the code. The caveats for this methodology is that we need to implement tiling in our input models (although really we would have to do this with the other methodology as well), and that we need to do a final UV pass to “undistort” the UVs. This UV pass is necessary due to one of the properties of bezier splines – that the “natural time”, the t value we feed the bezier algorithm doesn’t correlate with the distance we’ve traveled along the spline. So we cannot assume that a base mesh with evenly spaced verts will result in a warped mesh with evenly spaced verts, even if we’re distorting it along a completely straight spline. So, we have to re-UV.
Eesh! A naive spline-marching implementation of setting the terrain heights
The second challenge has been to make the underlying terrains come up to meet the road in a way that doesn’t result in significant clipping. I first tried a naive method of just marching along a spline, and drawing a line along the spline on the heightmap as I went. Unfortunately this didn’t work particularly well – even on completely flat roads, as shown to the right. When we transition from one spline to the next, we get significant tearing. It is also slow to calculate, and when you change the heights of nodes to something extreme, you get significant stepping depending on the order you march through the splines, so I changed tactic.
The second methodology I used was to take the bounds of the spline, and iterate through every heightmap point in that bounds. For every point on the heightmap, the question is – what is the closest point on the spline? If we can find the closest point on the spline, and set the height at this point on the heightmap to the height at that point, then we’ll get a nice, smooth and well fitting curve on the heightmap that will fit exactly under the road. Unfortunately, due to the whole thing with no non-integrated solution to correlating natural time with real distance through a spline, there’s no exact solution to this. We just have to find a decent approximate solution. I found some resources on this problem, but I’m the kind of programmer to just jump into a problem and try and solve it from the basics. A simple solution that I figured would work in all practicable solutions, where we weren’t doing crazy distorted splines, was just a binary search. The binary search is structured like so: start with an arbitrary point in space, p. take a segment (beginning with [0, 1]) and split it in half, so you have three points along the spline, p0, p1, and p2. Calculate the distance between p and all of these points. Now, compare the combined distances of p0 + p1, and p1+p2. Based on these results, we change the range we’re looking at on the spline and repeat the procedure, until some threshold of the accuracy of t is reached. The advantage is that the amount of iterations the algorithms requires is constant, depending on the accuracy threshold required. This works pretty well, and you can see a gif of the algorithm here:

So, now we have the closest point, it’s trivial to figure out what height a certain point in the terrain needs to be. From this poin, all I needed to do was blend the height we calculated with the road height, based on some falloff. However, this was still a little slow, so I put in the ability to get a spline’s object bounding box, so we can cull a large amount of height calculations for roads that aren’t orthogonal to the terrain heightmap grid. This sped up the calculation speed a lot. Throw in a blend with the original terrain, and this is the end result:
I’m pretty happy with this result! Next steps are implementing the UV mapping, and tiling meshes along a spline to allow for better poly concentrations on hard bends. More on this next week!
GAVKU
This week I have finished of a version of the jacket and done a few texture varieties for it. Its been made in such a way that you will be able to view gear you have equipped underneath it, ie a tshirt or combat vest that your character may be wearing.
This also involved tweaking and skinning to make sure there wasn’t an egregious amount of clipping with the gear underneath. To do this I bring a new mesh into a maya skinning file that has the player skeleton and base meshes loaded, as well as some test anims of his movement. I then copy skin weight of the player across and start testing the deformation, tweaking parts of the skin data until its at an acceptable point.
MILS
I made it to texture town this week. So I just did a little flat colour testing across the meshes. It’s looking really nice, all the normal maps came out well. I gave Tom the mesh and textures to make some gifs. Next week I’ll be adding some extra bits to the normal map and then moving onto the base texture details. After that I’ll design the graphics for the body kits and then I’ll be done.
TOM
I started this week working on validation for the crash system, adding checks to make sure you can’t use crashing to glitch through bases and terrain.
The crash system works by putting the player inside an invisible vehicle they have no control over and letting them tumble around until they come to a stop, then they get out. There are two opportunities for glitching, spawning the crash vehicle and leaving it after the crash.
Whilst it is easy enough to do various combinations of raycasts and overlap checks to check the new positions are clear, it is tricky to decide what should be done if these checks fail. For instance we perform similar checks currently when exiting vehicles to prevent players exiting through a wall into someones base, if the all the vehicle exits fail this check we prevent the player from leaving the car. Unfortunately this isn’t a good solution for the crash vehicle as you’d find yourself stuck forever if you come to a stop in an invalid location. Another option could be to kill the player but we felt this would be far too frustrating for players.
What we’re going to try is putting the player into a crawl mode after a post-crash validation fail which will allow the player to control their crash vehicle with physics forces until they push themselves into a location where it’s clear for them to stand up.
For spawning the crash vehicle we perform a capsule cast from the motorbike location to the desired spawn point, if this fails we spawn the crash vehicle directly on top of the motorbike instead.
Also this week I’ve been working on balancing vehicle damage. Just having an overall vehicle health felt a bit simplistic and led to vehicles either feeling like bullet sponges or being unrealistically weak so I’ve made the vehicle attachments a bigger part of the picture.
Technically currently on live all the attachments have their own health and can be individually destroyed in the same way you can remove wheels by shooting them off it’s just that all items but the wheels have huge damage reduction on them making it impractical and wasteful to remove them in this way.
I’ve rebalanced all these modifiers effectively reducing their health to reasonable levels and changed their behaviour so projectiles will no longer penetrate through vehicles like they do to players and made it so damage received by a vehicle attachment will not transfer through to damage on the vehicle.
This allows us to have reasonable levels of vehicle health without them feeling too weak and we can create more interesting attachments to drive decisions like, ‘do I use the heavy but strong armor panels or the lighter, faster but weaker panels?’.
It also allows us to do cool things like if you shoot storage panels off vehicles they will drop any loot being held in the additional storage slots.
I’ve also been tweaking explosions so vehicles take extra damage leading to chain explosions and making explosives a relatively hard counter to vehicles. I also made explosions apply a brief heat effect to nearby entities which if you’re close enough can be hot enough to ignite you (or in this case, the vehicle corpses left behind).
I’ve also been working getting Mils latest art into the game and setting up the paint slots and masks, its really starting to come together!
As for what’s left to do before you can get your hands on it:
- Replace placeholder crash and get up animations and create crawling animations
- Get final textures for the Kanga including the paint mask patterns
- Settle on the final Kanga itemsets
- Rework vehicle spawns and loot tables to include the Kanga
- Testing (especially balance and crash validation)